Your bars, seat and pedals, are the three points where you make contact with your bike and of course getting the position of these adjusted correctly will make a big difference to the way we ride. Steve Hogg steps us through determining correct cleat position.
Before getting down to the nuts and bolts of cleat angle/alignment, we need to determine the correct fore / aft placement of the cleat position, relative to foot in shoe.
Here’s how. You will need a pen, two cable crimps (alternatively, cut the ‘knot’ off two cable ties /zip ties), some adhesive tape and an indoor trainer.
Sit with bare feet. Using your index fingernail, feel for the joint space of the first MTP (metatarsophalangeal) joint—the first joint of your big toe at the ball of your foot. The joint space is usually in the approximate centre of the bulge of the bony protrusion of the joint, but there is a lot of individual variability in how obvious the joint space will be, though it will always be in the approximate centre. Use some care because many people have a bony depression somewhat forward of the joint space that can easily be confused for the joint space. If you are not certain, press in with the nail and leave an indent in the skin. Then place the tip of a pen in that indent at the vertical midpoint. Gently dorsiflex the toe (bend it up).
Did the pen tip move?
If yes, you have not yet found the axis of the joint, so try again with your fingernail. If no, then you’ve found the vertical centre of the joint space (the axis of rotation) and can mark that point with a short vertical line with a fine pen.
Now tape a cable crimp or zip tie ‘knot’ to that mark and put your shoe on without a sock. Fasten your shoe securely and then for the protrusion of the crimp or zip tie ‘knot’ in the upper of the shoe. Mark the centre of that protrusion on the shoe upper with a fine marker pen.
Now repeat this process on the other foot.
Then remove your shoes, remove the crimp and tape from your feet and put your shoes back on. Mount your bike on the indoor trainer and warm up until you are riding at reasonable load; that is, working hard. Look down and observe the angle at which each foot is sitting relative to the crank arm; the ‘heel in’ or ‘heel out’ angle of the foot.
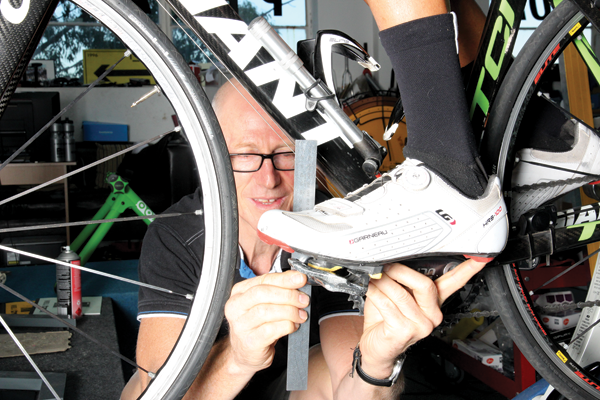
Get off the bike and remove your shoes and then fit each shoe back into the pedals. Crouch down beside your bike and rotate the cranks until the forward crank is horizontal with shoe. Level the shoe between where the sole joins the upper at mid heel and where the sole joins the upper under the middle of the cleat and using a T square, measure how far the mark you have made on your shoe is in front of or behind the centre of the pedal axle. Repeat this exercise on the other side and record both measurements.
You now have a good baseline cleat position.
Common advice that “the centre of the ball of the foot should be over the centre of the pedal axle” is, directly or indirectly, the cause of more injuries and bike related issues than I can convey in a short article like this one. Many people can place their cleat so that the ball of the foot is over the pedal axle and perform well, but just as many fall prey to injury or reduced performance so it is severely flawed as a general recommendation. It is no accident that the cleat mounting holes of many popular brands of shoe have migrated rearwards over the last 20 years.
To refine the position of your cleat you can use this table as a starting point.
Shoe size 36 – 38: Centre of ball of foot 7 – 9 mm in front of the centre of the pedal axle
Shoe sizes 39 – 41: 8 – 10 mm in front
Shoe sizes 42 – 43: 9 – 11 mm in front
Shoe sizes 44 – 45: 10 – 12 mm in front
Shoe sizes 46 – 47: 11 – 14 mm front
Shoe sizes 48 – 50: 12 – 16 mm in front
Then a few caveats are necessary.
The table recommendations here are for road and criterium riders. For true sprinters like track sprinters and kilo riders, halve the amounts shown in the table.
The recommendations above are for those with ‘Joe Average’ or ‘Josephine Average’ pedaling technique. If you drop your heels more than most while pedaling under load, move your cleats back 2 or 3 mm more than the recommendations above. If you are an exceptionally toe pointing pedaler under load, then you can place your cleats 2 – 3 mm further forward than the table above shows.
The table is designed for those who race or ride in fast bunches where fierce off the seat efforts are necessary. For those who don’t need to do this and who prioritise lower intensity or longer efforts without plentiful accelerations, there are plenty of positives and no negatives with positioning your cleats back further still than the table shows, with the exception of a reduced ability to accelerate really hard when riding off the seat.
The reason for the difference is this. Every watt of power you produce is applied to your bike via your feet. Your feet need to be a stable, secure platform with which to transfer the power you apply to the bike. The further back the cleat, providing it is not behind the TMT (tarsometatarsal) joints (the midfoot), the more stable the foot is on the pedal and the less muscular effort is required of the lower limb to ensure that stability. But the further back the cleat, the more your ability to accelerate is hindered. Why?
When we sprint off the seat, body weight is added to the muscular force produced by the legs which increases the pressure that can be applied to the pedals. This requires the rider to move forward over the bottom bracket (the axis of rotation of the cranks) which in turn increases the size of the ‘dead zone’ either side of the top and bottom dead centre of the pedal stroke where little leverage can be applied. Every sprinter unconsciously solves this problem in the same way; that is by forcefully pulling the heel of the bottom foot upwards just after bottom dead centre in an effort to get the top foot through the top dead centre in the pedal stroke. The further forward the cleat, the easier it is to accomplish this forcefully. The further back the cleat, the harder it is to accomplish this forcefully. The table provides a good balance between the contending requirements of being able to accelerate really hard off the seat and being able to sustain effort over time efficiently.
Cleat Angle
Now that you have an effective cleat position, you need your cleats positioned at an angle that allows some free rotational movement either side of that point. Why?
It’s cheap insurance. From time to time I will come across a client who strenuously protests that they don’t like ‘freeplay’ cleats because their feet “slop around” in the pedal. To be very, very clear, if a rider’s feet slop around in the pedal, there is something wrong with their position, their foot correction or the way that that they function.
Using fixed cleats as a shortcut to avoiding foot slop is a high risk strategy and I’d best explain why. There are three major joints involved in pedaling; the hip, knee and ankle. The hips and ankles can work happily through a variety of planes but the knees are more or less a hinge joint. Knee pain caused by cycling is the number one complaint but rarely is it the knees that are the culprit. Instead they are usually the victim of issues caused by hip and lower back issues at one end, or foot ankle issues at the other forcing the knee to work other than in its preferred hinge like single plane. Sometimes a combination of both hip / lower back and foot / ankle issues are the cause of knee pain.
If you are compromised functionally, and the vast majority reading this will be, using freeplay cleats with a measure of free movement either side of where your feet naturally sit on the pedals under load really is cheap insurance against injury.
Here’s how to arrive at the right cleat angle for you. The process that follows below can be undertaken while riding on a quiet street or when riding on an indoor trainer.
Warm up thoroughly.
Change into a gear that forces you to apply reasonable load to the pedals. Reasonable load is that which makes you work hard, but not so hard that technique is compromised. While applying reasonable load, stop pedaling and coast with right foot forward. Please ensure that your heel is slightly above the crank arm. Attempt to move your heel inwards towards the crank arm. If there is enough rotational movement to allow this, fine.
If you there is not, dismount from the bike, remove your right shoe and move the nose of the cleat so that it points further towards the inside edge of the shoe. Now remount the bike and repeat step two as many times as necessary until there is free movement of heel towards the crank arm while you are coasting.
Repeat the ride and coast exercise again but this time while coasting, attempt to move your right heel outwards from where your foot naturally sits while pedaling under load. Is this possible?
If yes, fine. If no, then remove the shoe and adjust the cleat so that the nose points further towards the inside edge of the shoe. Repeat steps two to four as many times as necessary until you have some free movement either side of where your foot naturally sits on the pedal under load.
Repeat the entire process on the left foot before double checking both feet again.
Once the process of determining cleat angle is completed, some of you will have feet that ‘slop around’ on the pedal. The next instalment in this series, Foot Correction, will be devoted to ensuring that the problem of ‘foot slop’ is resolved.